

Hi everyone! Today I’m back to share the fun fall decor idea I teased you with on Monday that I made for our Watch Us Wednesday Tutorial at The Kraft Journal. This week’s challenge is Lavish Layers, and this little pumpkin is just perfect for it, as it is just that……..lots and lots of layers. 10 paper rosette layers, as a matter of fact.

If you have an Archiver’s in your area, you may have seen this pumpkin and its accompanying project sheet there. I could not wait to try it out for myself, being the pumpkin lover that I am.
To get started, you will need:
8 (12×12) sheets of solid cardstock or double-sided patterned cardstock for the pumpkin
1 sheet of cardstock or patterned paper for the leaves
1 sheet of Brown Kraft Coverweight Cardstock for the stem
1″ circle punch
score board
glue gun
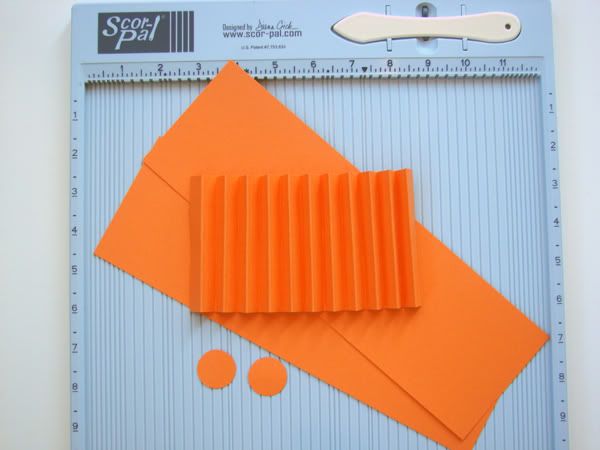
1. Start with the center rosette for the pumpkin. Cut (3) 3.5″ x 12″ strips and score every 1/2″ with a score board.
2. Punch (2) 1″ circles. You will need two of these for each layer.
3. Fold the paper strips back and forth like an accordion.
 4. Adhere the three paper strips together to create one long piece. The original instructions suggested using Tiny Attacher staples. I used Tacky Glue.
5. Adhere the ends together to make a circle.
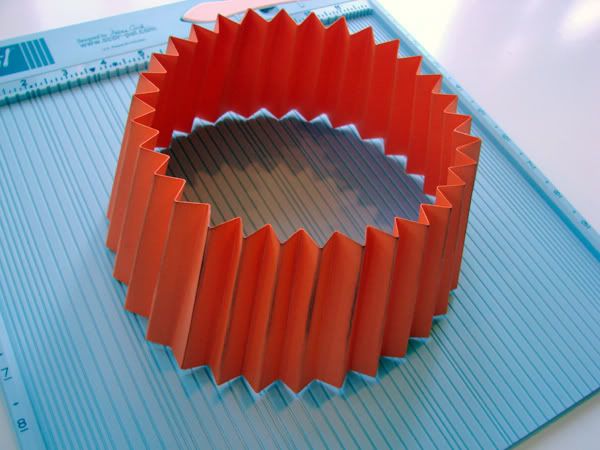 6. Push downward on the top edges of the accordion, until it flattens, and then push it together towards the center to create a rosette. Hold in place.
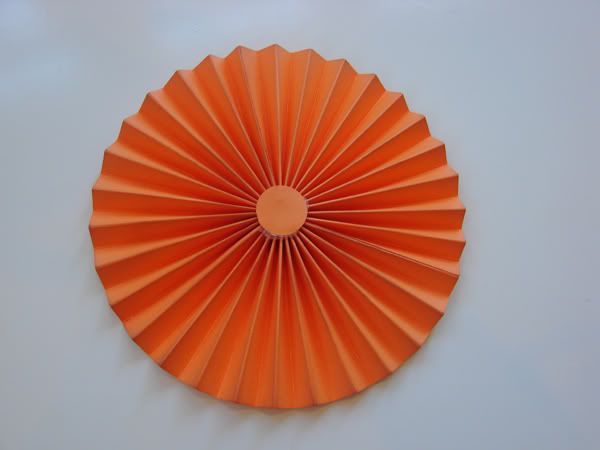
7. Using a glue gun, place hot glue on the center of the rosette and add a 1″ circle. Once the glue has set, flip the rosette over and adhere another circle to the other side. Edge the rosette with brown chalk ink. You now have the center for your pumpkin.
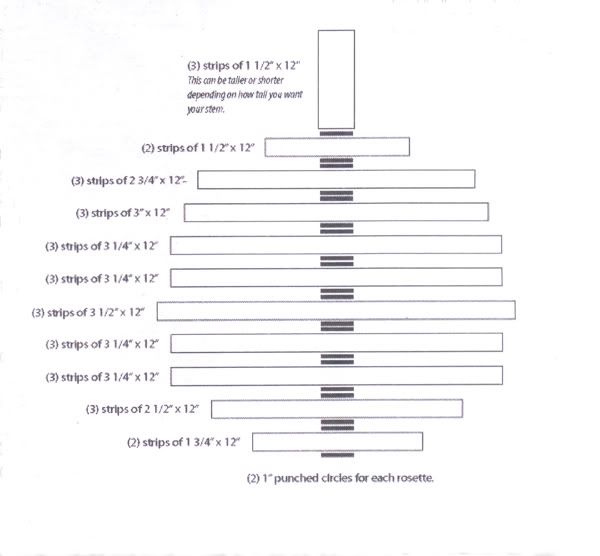
 8. Repeat these steps using the diagram for the sizes and quantity of strips for each layer working your way down and then towards the top.
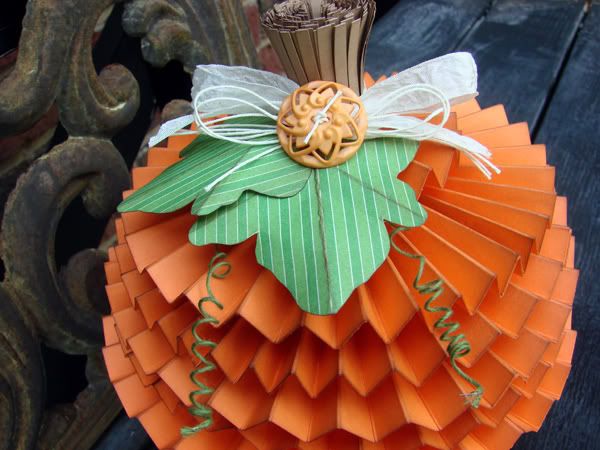
 9. Once you have adhered all 10 layers, you will have your pumpkin shape.
 10. For the stem, cut strips from Brown Kraft Coverweight Cardstock. (The directions call for 12″ strips, however 11″ strips work equally well.) Cut fringe into each strip of cardstock and edge with brown chalk ink. Apply a thin bead of hot glue using the glue gun along the uncut edge and roll the cardstock into a tight circle. Add the next strip, followed by the third. Adhere stem to the top of the pumpkin using hot glue.
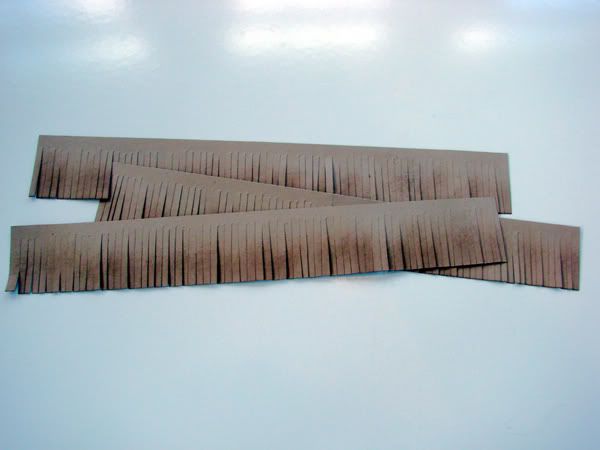 11. Decorate your pumpkin as desired with trim, wire and buttons. I added a bow of Adelaide Seam Binding and Hang Tag String, along with an orange button. Die cut or hand cut leaves from green cardstock or patterned paper. Add curly-q wires for pumpkin vine.
So, so cute, right? Love this guy! I’ve happily added it to my pumpkin collection……..because a girl can never have too many pumpkins. 🙂
Hope you join us for our Lavish Layers challenge at the Kraft Journal. You still have until 6 pm EST on Sunday Oct. 9th to link your projects to the gallery. All of our followers who participant in our challenges for the month of October have a chance to be featured on our “Feature Me Fridays” posts as well as be entered to win a $15.00 Kraft Outlet Store Voucher! The more challenges you enter this month, the more chances you have to win!
And don’t forget, we’re still looking for some kraft project tutorials…
Product Tutorials Wanted
Have you created a tutorial that showcases products you’ve purchased from Kraft Outlet? If so, we’d love to feature you in one of our future Watch Us Wednesday tutorial segments of the blog. To be considered send an email to DT Leader Beth Moore (bethcat at sbcglobal dot net), with a product photograph and link to the tutorial and you may be selected as one of our Featured Artists on Watch Us Wednesday!
Thanks so much for stopping by today! Wishing you a wonderful day.

Fabulous!!!! Wow – I just love this! I have a much smaller scale 3d pumpkin on my blog today too!!
Thanks for the tutorial!!!
Maria
Simply amazing! This is beautiful!
Audrey! SO STINKING cute! Love this and all your projects are amazing! I may have to give this a try 🙂 Anxiously awaiting my Kraft Outlet order 🙂
Are you kidding me!… that is so cute… and easy… must make!
Maddie
You are uber-talented, Ms.A!! You never fail to amaze me with ur crafty projects. This layered pumpkin is amazing!! What a fab tut 😉
Oh how cool! LOVE! Really love the way you did the stem too! I bet I’ll be seeing this project all over Pinterest!
Holy SMOKES!! This is AMAZING Audrey!! WOW WOW WOW WOW!! I loveeeeeeeeeeeeeee it! :):):):):):):):):):):)
Wow, what an amazing creation! you are just so talented!
OMG … thud! Jaw-dropping fantastic! What patience you have for all that cutting, scoring and layers — A-MAZING! Now you’ve done it — I want to make one for myself!!! Fabulous, Audrey 🙂
WOW, you are just so talented. This tutorial is amazing, something fun to do with the whole family!
Hugs
Tanya
How amazing is this!
I love this…we don’t celebrate halloween but this project is beautiful!
Awesome!!!!!!! The cutest pumpkin ever! 🙂
YAY! This is sooooo awesome. what a creative idea! And it turned out soooooo FAB!!!!!
Audrey Audrey Audrey….;) Love this!!!! You are so clever with this!!! How cute and FUN! and am always loving how you always do up your house for different seasons 😉
love
jaz
This was defintely worth the wait! Oh my gosh this is so cute. Hmmm… I think Bazzill cardstock is still on sale at Michaels this week. LOL Thanks for the great tute Audrey!
Audrey this is so cute! I love the texture that the accordion fold gives the pumpkin and the button and seam binding are a beautiful touch. What a fun fall decor idea, love it!
Girl! This is crazy amazing! What a cool project to share with us today! You are totally inspiring friend! Such a treat to stop by this happy blog each day! Hugs.
This is ADORABLE!!! I LOVE IT, Audrey!!
Ohhhhh soooooooo CUTE and FUN!
Holy Pumpkin Batman…this is fabulous! I knew it was worth waiting for .What a gorgeous Halloween project. Thanks so much for sharing
Another fun pumpkin, totally fabulous, and thanks so much for the tutorial, lots to learn here!!!
OMG! This is FABULOUS! You are always so creative. I think I am going to have to CASE this.
wow! That’s amazing!! Love it:)
Holy smokes!!! This is awesome!! Fantastic project and tutorial!
Oh my…you are always chock full of creative ideas!!! I love your sweet pumpkin!
Sooooo clever! And it looks amazing! 🙂
This is adorable! Thanks for the idea and the tutorial.
I must make one for my classroom. Love how you made this. So fun & festive for Halloween. 🙂
Wow! What a great project for fall and seems like something even I can make and I’m not that great with assembled projects, lol! I adore it!!
This is SO awesome! TFS!
Absolutely Fabulous Audrey!! You are so creative my friend! What a fun and unique Fall decoration, I just love it!! Thanks for sharing the instructions, I’m definitely adding this to my “to do” list along with your pumpkin jars! Hope you have a wonderful weekend!
I already knew you are a n extremely talented and creative woman. And such an inspiration. This pumpkin; all I can do is sit and stare….fabulous!!!!!!!!!!!
And thank you so much for the great tutorial! 🙂
wow this is cool thanks for sharing!