‘Tis the Season with Ranger Ink


Happy Monday, crafty friends, and happy December! Did you all make any headway on your holiday to-do list this weekend? I broke into a few more tubs of decorations, but made very little progress, I’m afraid. You all know me by now….. you know these halls get decked in more than a few boughs of holly…. and these things just can’t be rushed. Or at least that’s what I tell myself when I’m as slow as a snail. Regardless of all that, I do love this time of year. ‘Tis the season to be jolly!


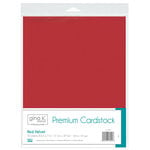
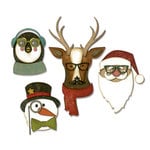
Today I have the great pleasure of sharing this holiday card and project tutorial over on the Ranger Ink blog. These sweet Christmas characters are from the new Cool Yule die set that Tim Holtz released with Sizzix this year. I just adore the personality on these guys, and have such fun dressing them up with all the different accessories in the set.  I used a mix of Distress watercoloring, sparkly deco tape, and bright red cardstock to create my images, and paired them with some fun new products from Ranger’s Letter It line.


Good grief, those guys are cute, aren’t they? Both Santa and Rudolph seem to have hit the eggnog a bit too hard with those bright red noses. I used a white wax pencil to add highlights in the shiny areas, and white embossing powder adds a bit of fluffy texture to all the white hair, fur, and frame pieces. I die cut some extra pompoms from Santa’s hat and cut them in two to create the little hands…. errrr, mittens…. um, hooves?


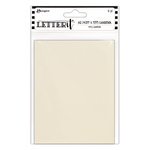
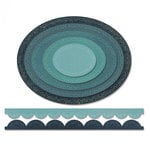
The oval window frame is from my well-used and well-loved Stitched Ovals die set. The ivory cardstock, stencil, and holiday stamp are all part of the Letter It collection. The bit of Perfect Pearls splatter is, too. I’ve got all the details and step-by-steps up on the Ranger Ink blog, if you’d like to learn more.

Thanks so much for stopping by! Hope you all have a wonderful week!


The supplies I’ve used are linked below:

Ranger Ink - Wendy Vecchi - Perfect Cardstock - Grey CardsRanger Ink - Letter It Collection - Cardstock - IvoryRanger Ink - Tim Holtz - Distress Watercolor Cardstock - 8.5 x 11 - 10 PackTherm O Web - Premium Cardstock - 8.5 x 11 - Red Velvet - 10 PackTherm O Web - Premium Cardstock - 8.5 x 11 - Black Onyx - 10 PackRanger Ink - Letter It Collection - Clear Acrylic Stamps - ChristmasSizzix - Tim Holtz - Alterations Collection - Christmas - Thinlits Die - Cool YuleSizzix - Tim Holtz - Alterations Collection - Thinlits Die - Stitched OvalsRanger Ink - Letter It Collection - Background Stencil - Organic StripesB01CUTQXHWRanger Ink - Letter It Collection - Pearl Powders - Set 1Ranger PERFECT PEARL Powder PPP17714Tim Holtz Distress Ink Pads - Tattered RoseRanger Ink - Tim Holtz - Distress Ink Pads - Candied AppleTim Holtz Distress Ink Pads - Antique LinenTim Holtz Distress Ink Pads - Frayed BurlapTim Holtz Distress Ink Pads - Brushed CorduroyRanger Ink - Tim Holtz - Distress Ink Pads - Gathered TwigsRanger Ink - Tim Holtz - Distress Ink Pad - Hickory SmokeRanger Ink - Tim Holtz - Distress Oxides Ink Pads - Spun SugarTim Holtz Distress Ink Pads - Embossing Ink ClearRanger Ink - Tim Holtz - Distress Paint - Picket FenceRanger Ink - Basics Embossing Powder - WhiteRanger Ink - Artist Brushes - 7 PackRanger Ink - Tim Holtz - Mini Ink Blending Tool - Round

White Wax Pencil

Save

Winter Wishes with Ranger Ink

Hello, hello Friends!

Happy Monday! Hope you are doing well!  I’ve been missing visiting with you all lately, and I hope you will bear with me for just a little bit longer. The countdown is on now for CHA, and finally, I am beginning to see the light at the end of the tunnel. But there’s still much left to do, and one final  week of crazy to get it all done. Can’t wait to start sharing what I’ve been up to, catch my breath a bit, and catch up with all of you. Soon….

p1120902
I’ve been seeing lots of snow pictures on Facebook lately, and this weekend, we had our first snowfall of the year here in North Carolina, too. Not much of a snow right where I am, but it sure is pretty. And rather a rare occasion for us these days.

audreypettit-ranger-winterwishescardAlthough there’s not enough snow on the ground to build a real snowman, I thought it was fitting to share one with you today. So here’s a little frosty friend that I made for the Ranger blog, featuring a pretty winter Distress palette and lots of snowy dies from the Tim Holtz collection.

audreypettit-ranger-winterwishescard3
This sweet Assembly Snowman die that I used has a bit of a Christmas look to it in it’s original form. But by removing the top hat and holly leaves, and substituting in simple details and a pair of frosted pine cone charms, this holiday gent easily transforms into a winter woodland one, instead.

audreypettit-ranger-winterwishescard2
Of course a snowman needs a snowy scene, with a bit of ice and sparkle and shine, too. I’m glad we didn’t get quite this much snow, here in the real, though. Just enough for a card, will do!

And if you’re interested in learning more about this card, stop by and check out my full tutorial on the Ranger Ink blog.

Thanks for stopping by, my friends! Wishing you all a wonderful week ahead!

Thankful Pockets with Sizzix

Hello Friends! Today I have another fall Thanksgiving project to share. This time, thankful pocket place settings that I made for Sizzix using brand new dies from Brenda Walton’s Everyday Favorites collection.

AudreyPettit Sizzix ThankfulPocket
These fun pockets would be a perfect addition for your holiday Thanksgiving table this year. The pocket design is so easy to put together, thanks to the help of this fabulous new Library Pocket die by Brenda Walton. And I love that there is plenty of room on the insert for adding journaling cards and handwritten notes. I think these would be fun for guests to write down what they are most thankful for this year on the bottom of the insert, and then tuck them away in the pocket for safekeeping.

AudreyPettit Sizzix ThankfulPocket2

I dressed the front of my pocket up with lots of pretty trims, and a pair of Millinery Leaves from another of Brenda’s fabulous new dies. The embossed dots and Distress ink color palette add an extra burst of cheer. And I really love that bit of rustic Kraft thrown in. Such a perfect fall look.

AudreyPettit Sizzix ThankfulPocket3
I’ve got the full step-by-step tutorial for creating these pockets up on the Sizzix blog, if you’d like to see more. Thanks for stopping by! Wishing you all a wonderful day.


Sizzix.com Products:

Other Products:

Ranger 8.5 x 11 KRAFT CARDSTOCK Inkssentials Surfaces ISM35244Ranger Inkssentials 8.5 X 11 MANILA CARDSTOCK Surfaces ISM28246Tim Holtz Distress Ink Pad VICTORIAN VELVET Ranger TIM27195Tim Holtz Distress Ink Pad WILD HONEY Ranger TIM27201Tim Holtz Distress Ink Pad SPICED MARMALADE Ranger TIM21506Tim Holtz Distress Ink Pad WILTED VIOLET Ranger TIM43263Ranger MINI ROUND INK BLENDING TOOLS IBT40965Ranger 4 Oz. MULTI MEDIUM MATTE Paint Glue INK41535Ranger Inkssentials Non Stick CRAFT SHEET 15 X 18 Reusable NSC20677Ranger Inkssentials MINI MISTER Spray Bottle Tool IMMR13593Ranger Inkssentials US HEAT IT CRAFT TOOL HIT00471 United States Use

Stamp, Ink, Trim: Stampin’Up
Other Trim: Webster’s Pages, Craft Supply, Divine Twine

XOXO with Sizzix

Hiya Sweeties! Happy Friday! Just two more days until graduation!

AudreyPettit-Project#4-HelloCard
Today I wanted to share a quick Sizzix tutorial with you, for creating a sweet all-occasion friendship card using a fun mix of Tim Holtz Alterations dies and Idea-ology vintage ephemera.

AudreyPettit-Project#4-HelloCard4
This card uses some of my most favorite things. Pretty Distress Inks, some awesome dies, a big shabby bow, and lots of fun vintage images. But I have to say that my favorite part has got to be that cool honeycomb pattern in the background, made with just one of the four intricate pattern dies from the Mixed Media Thinlits die set.

AudreyPettit-Project#4-HelloCard2
I die cut that panel from manila cardstock, and then inked it up with a variety of yellow and green Distress colors, such as Peeled Paint, Scattered Straw, and Wild Honey. The inner pieces were removed and inked separately, so that I could get a wider range of color. I then layered the panel onto a second piece of manila cardstock, and pieced some of the die cut shapes back into the honeycomb, leaving the rest empty. Kinda like building a jigsaw puzzle.

AudreyPettit Sizzix ThinlitsFramelitsSandwich
To get started, die cut the honeycomb lattice Mixed Media die from manila cardstock using this standard Sizzix die cutting sandwich for Thinlits and Framelits dies: Magnetic Platform, Standard Cutting Pad, paper, die (cutting side down), Standard Cutting Pad.

AudreyPettit Ranger ThankfulHanging Tut1
Dab a variety of Distress Inks or Stains onto a non-stick craft sheet. Mist the inks liberally with water until beads form. Remove the inner pieces from the die cut panel, and then press the front of the cardstock into the ink mixture. Allow to dry completely. You can repeat this process, if you’d like to darken or intensify any of the color.

AudreyPettit Sizzix TrulyGreatFriendsTag Tut3
Cut a length of Tim Holtz Crinkle Ribbon that is about 12-15 inches long, and use the ribbon to mop up any remaining ink on the craft sheet. Set the ribbon aside to dry. Add a bit more Distress Ink to the craft sheet, and ink just the inner pieces of the honeycomb lattice. Set those aside to dry, too. If you’ve got any ink left over, bring back the ribbon, and mop it up again.

AudreyPettit-Project#4-HelloCard3
Layer the honeycomb panel onto a larger piece of manila cardstock, and then onto a layered card base. I used two pieces of Distress Core’dinations cardstock for my card. Sew around the edges of the panel, if desired, and then piece the inner shapes back like a puzzle. Add a bit of Clear Rock Candy Distress Paint over the lattice area when you are finished. Then add some vintage images. I used two botanical and nature prints from the Thrift Shop Idea-ology ephemera pack.

AudreyPettit-Project#4-HelloCard5

The sentiment was die cut from a strip of manila cardstock using one of Tim’s new Thinlits die sets called Friendship Words: Block. I removed the positive letters and set them aside for another project, choosing to use the negative space instead. That’s what I love the most about this die set…. so versatile, and with 16 words in the set, you’ll have no trouble finding the right word for any occasion.

Thanks so much for stopping by, my friends! If you are interested in any of the products I’ve shared with you today, I’ve got a special discount code for you (SZB2015), good anytime until December 31st for 15% off regular priced purchases at Sizzix.com. (sorry Sizzix only ships within the US at this time).

Wishing you all a wonderful weekend!

Medium_660220
Sizzix Thinlits Die Set 4PK – Mixed Media

Medium_660213
Sizzix Thinlits Die Set 16PK – Friendship Words: Block

Medium_656499
Sizzix Accessory – Standard Magnetic Platform for Wafer-Thin Dies

Medium_655093
Sizzix Accessory – Cutting Pads, Standard, 1 Pair

Medium_657900
Sizzix Big Shot Machine Only (Powder Blue & Teal)


Life’s Moments with Ranger Ink

Hi everyone, and happy Monday! Today is a very happy day for me! I’m so excited and honored to share that I am guest posting over on the Ranger Ink blog with a fun, inky project featuring the gorgeous new Flower Garden stamp set by Tim Holtz.

Capture Life's Moment Card by Audrey Pettit | www.rangerink.com

I think of all the amazing new Tim Holtz product that has come out from CHA this year, this Flower Garden stamp set has got to be my favorite. I absolutely love the mixture of flowers and stems included in this set, and the simple outline stamp images lend themselves beautifully to lots of different coloring techniques.

Capture Life's Moment Card by Audrey Pettit | www.rangerink.com

I have been quite smitten with watercoloring recently, so of course that is what I did on today’s card. I love the loose, organic flow you get with watercolors and how each piece ends up being just a little bit different than the others. By far, my most favorite way to watercolor is with Ranger Distress Ink, as there are so many amazing colors to choose from, and of course they blend beautifully.

Capture Life's Moment Card by Audrey Pettit | www.rangerink.com

I used a variety of Distress colors here, but mostly I was excited to try out a couple of the new 2015 Distress colors for the very first time… Cracked Pistachio and Abandoned Coral. Ohmyword, so beautiful!

Capture Life's Moment Card by Audrey Pettit | www.rangerink.com

I threw in a bit of metallic Distress Spray Stain, and lots of layers of paper, vellum, and matching Core’dinations cardstock. A metal Word Band, and some Tim Holtz Jute String, too.

If you’re interested in learning more, I have the full step-by-step tutorial up on the Ranger Ink blog.

Thanks so much for stopping by! Wishing you all a wonderful day!

Sizzix Tutorial- Let’s Explore

Hi everyone, and happy Monday! I hope you all had a wonderful weekend! Today I have a quick Sizzix tutorial to share with you featuring new Tim Holtz Alterations dies from the March release.

AudreyPettit-Project#7-ExploreCard
Tim’s March release is all about exploration and travel, and is filled with fun global inspired products. I used three of his new sets here, mixed with an earthy palette of Distress and Idea-ology to create a shabby, grungy travel card that’s perfect for someone setting off on a vacation, or starting a new journey in life.

AudreyPettit-Project#7-ExploreCard2

This is the Postage Dots Thinlits and Mini Airplane & Cloud Movers & Shapers from the March release. And the sentiment is from the new Adventure Words Block Thinlits set. I added lots of layers of Core’dinations Distress cardstock, and some Idea-ology Wallflower patterned paper and Thrift Shop Ephemera, too. Remnant Rubs add a bit of extra detail as well.

AudreyPettit-Project#7-ExploreCard3
I love the way the world looks in miniature when viewed from the window of an airplane. Almost like a giant patchwork quilt. And that’s exactly what this panel die cut with the new Postage Dots die reminded me of, and what I tried to re-create on my card. I really adore the rich, earthy color I got using some of my favorite colors of Distress.

AudreyPettit Sizzix ThinlitsFramelitsSandwich
To create my main panel, I die cut the larger Postage Dots die from manila cardstock using this standard Sizzix die cutting sandwich for Thinlits and Framelits dies: Magnetic Platform, Standard Cutting Pad, paper, die (cutting side down), Standard Cutting Pad.

P1080540
The Postage Dots die pierces all those tiny holes you see separating the sections.. but as often the case with such intricate dies, some of the tiny pieces may be left behind. That’s where a new Sizzix tool, the Die Brush, comes in mighty handy.

P1080542
Simply lay your die cut down onto the foam pad included in the kit, and roll over the top with the die brush. The bristles of the brush get down into the cuts and grooves, and remove all the tiny pieces for you.

AudreyPettit-Project#7-ExploreCard4
Then my panel was ready for color, which I applied by masking off each section with post-it notes, and inking with a Ranger ink blending tool. Once each section was colored, I lightly spritzed the panel with water to blend and bloom the ink.

AudreyPettit Sizzix MoversShapersSandwich
The sentiment lettering was die cut also from manila cardstock using the Sizzix sandwich mentioned above, and inked with blue Distress. I used the positive letter cuts from the Word Blocks dies, but you could just as easily use the negative space to create some fun and unique title work. The airplane and cloud were die cut using Tim Holtz Grungeboard. Since the Mini Airplane & Cloud dies are Movers & Shapers dies, you will need to use the Movers & Shapers Base Tray and this die cutting sandwich: Standard Cutting Pad, Base Tray, die (cutting side up), paper, Standard Cutting Pad.

I inked and painted the airplane and cloud, then added a shiny coat of Clear Rock Candy Distress Crackle Paint. Added them to my card using foam adhesive. Then finished off with a few rubs and a bit of twirled string for the plane’s contrail.

Thanks so much for stopping by! Wishing you all a wonderful day!


Supplies:

Medium_660238
Sizzix Movers & Shapers Magnetic Die Set 2PK – Mini Airplane & Cloud

Medium_660212
Sizzix Thinlits Die Set 13PK – Adventure Words: Block

Medium_660221
Sizzix Thinlits Die Set 2PK – Postage Dots

Medium_657007
Sizzix Movers & Shapers Accessory – Base Tray, L

Medium_660513
Sizzix Accessory – Die Brush & Foam Pad for Wafer-Thin Dies

Medium_656499
Sizzix Accessory – Standard Magnetic Platform for Wafer-Thin Dies

Medium_655093
Sizzix Accessory – Cutting Pads, Standard, 1 Pair

Medium_657900
Sizzix Big Shot Machine Only (Powder Blue & Teal)


Hello Easter with Sizzix

Hello, hello Friends, and happy Wednesday! Today is a happy day in our house! After losing the beginning of our spring break for snow make up days, today is the last day of school before we start our wee mini baby spring break tomorrow. I know two days off isn’t much of a spring break… but I’m thinking of it more as an extra long weekend. And that is still A-Okay in my book!

AudreyPettit Sizzix EasterElementsHelloCard
This week, I’ve got a bit of an Easter Theme going here on the blog. Today I thought I would continue on with another card idea, this time one I made for the Sizzix blog using lots of favorite Tim Holtz dies and bright and happy papers from BasicGrey’s Vivienne collection.

AudreyPettit Sizzix EasterElementsHelloCard2
One of my absolute favorite images for Easter projects is this fabulous big chocolate bunny from the Tim Holtz Easter Elements Bigz die. I really love the large size of this bunny, and have used it for so many different kinds of projects. For today’s card, I’ve framed my rabbit in a little garden scene, complete with lots of green grass and spring flowers. And I’ve used a couple of different techniques for adding extra interest to my die cuts with stamps, embossing, and watercolor ink

AudreyPettit Sizzix EasterElementsHelloCard3
I do love the embossed flowers I added to the bunny’s behind, and the washed ombre effect on the framework is kind of fun, too. I’ve got a complete tutorial on all of that over at the Sizzix blog, if you’d like to learn more.

Thanks so much for stopping by! Hope you all have a wonderful day!

True Heart Tattered Florals with Ranger Ink

True Heart Tattered Floral Card by Audrey Pettit | www.rangerink.com

Hello, hello Friends! So glad you could stop by! Today is a very happy day for me, and I am soooo excited to share my project with you! If you all could use a little burst of spring right about now, I’ve got one for you today…. with this pretty tattered floral card I made for a guest post over on the Ranger Ink blog.

True Heart Tattered Floral Card by Audrey Pettit | www.rangerink.com

Although we’ve had a fairly mild winter here, the last week of ice and snow has definitely made me ready for soft sunny skies, warm air, and lots of pretty flowers. And since the real flowers are weeks, if not months, away, I thought I would make my own spring garden with the help of some of my all-time favorite Tim Holtz goodies.

True Heart Tattered Floral Card by Audrey Pettit | www.rangerink.com

Love how soft and shabby my project turned out, and how life-like the flower looks, too. It never ceases to amaze me how many unique flower creations I can manage to make from the Tattered Florals die, no matter how many times I use it. I think it was the very first Tim Holtz die I ever bought……and I don’t think I will ever tire of it.

True Heart Tattered Floral Card by Audrey Pettit | www.rangerink.com

Sigh…. such pretty pastel colors! And lots of inky fun! I’ve got the complete, step-by-step tutorial up on the Ranger Ink blog, if you’d like to learn more.

Thanks so much for stopping by! Wishing you all a bright sunshiny day!

Deco Foil Valentine Frame with Therm O Web

iCraft-Foils Color-Shot

Valentine’s week continues here on the blog today with another love-themed project share. This time, it’s a little home decor project I made recently for the 2015 CHA Mega Show using Therm O Web’s fabulous new line of Deco Foils.

AudreyPettit Thermoweb DecoFoil LoveFrameI have to say, this is one of my favorite Deco Foil projects, ever. Wish you could see how shiny and beautiful this foil looks in person. The red is so vibrant….. absolutely perfect for Valentine’s Day. Love it paired with bold black and just a light soft wash of pale pink. Makes your eye zoom straight to the hearts here, before taking in the cool background. Just what I wanted.

AudreyPettit Thermoweb DecoFoil LoveFrame2I love how the texture on the hearts turned out. This is the look you can achieve when using the liquid Deco Foil glue with the Deco Foils, and I’ve shared this technique with you before on the pretty Deco Foil gift box I shared here recently on the blog. For this effect, I simply applied some liquid Deco glue onto plain white cardstock, then brushed the glue out using a back and forth motion with a wide, flat paintbrush.

AudreyPettit Thermoweb DecoFoil LoveFrame3Once the glue has dried to become completely tacky, it is ready for the foil. I absolutely love how every brush mark shows, creating a unique striae not unlike woodgrain. Once the foil is applied, the piece can be cut, punched, die cut, torn… whatever you wish. I used Tim Holtz’s adorable Love Struck Alterations die here to create my hearts and arrows. I cut slits in the hearts to thread the arrows through, and added tiny hang tags made with a PTI die and my favorite alpha stamps. The shabby background is a work of he{art}, too. I had so much fun making it with my Distress inks and paint, stamps, and torn dictionary paper. I liked how it turned out so much, I recreated the process again on a smaller piece so that I could share a tutorial with you. Click on the link, if you’d like to learn more:
Joy Frame Tutorial

AudreyPettit Thermoweb DecoFoil LoveFrame4

Thanks so much for stopping by! Wishing you all a wonderful day!

Snowman Thanks with Sizzix

Hello, my Sweets! I hope you all had an amazing Christmas day yesterday, filled with love, happiness and the spirit of the season!

AudreyPettit Sizzix ThanksSoMuchSet
It truly was the most wonderful Christmas here at my house. I am so incredibly blessed to have had both of my adorable kiddos and both of my sweet parents to celebrate the day with, and boy, oh boy…. was Santa ever good to me!

AudreyPettit Sizzix ThanksSoMuchSet2
Now that the holiday is over, I am finding myself in serious need of thank you cards. So I’ve pulled out a few of my favorite Sizzix Tim Holtz goodies to make some fun winter-inspired notecards to share with you today. These little cuties are quick and easy to put together, good for making in bulk, with special emphasis on being mail-friendly.

AudreyPettit Sizzix ThanksSoMuchSet3

I am a sucker for cute snowmen, and this little guy gets me every time. I love Tim Holtz’s blueprints. So quirky and fun, and better yet, easy to color. I pulled out a few markers and Distress inks to brighten up his snowy  scene, and added a quick stamped sentiment and embossed snowflake background.

Here’s a few easy steps.

AudreyPettit Sizzix ThanksSoMuchSet Tut1
Cut a panel of kraft cardstock to fit the front of a standard A2 card base, and emboss with the snowflake embossing folder from Tim’s Snowflake Pattern & Plaid Set.

AudreyPettit Sizzix ThanksSoMuchSet Tut2
Swipe the raised portions with Picket Fence Distress Paint.

AudreyPettit Sizzix ThanksSoMuchSet Tut3
Cut 3″ x 5.5″ panels of white cardstock and stamp the snowman from the Framelits Snowman Blueprints stamp and die set in the center of the paper.

AudreyPettit Sizzix ThanksSoMuchSet Tut4
Color frosty and add Broken China Distress Ink to the edges of the panel using an ink blending tool. Add stamped sentiment, and tie hemp around the bottom. Machine stitch the paper, if desired. Then top it all off with a few stamped and embossed snowflakes.

Thanks so much for stopping by! Wishing you all a wonderful, quiet, and peaceful day!

Supplies:
Sizzix Framelits Die Set 6PK w/Stamps – Snowman Blueprint
Sizzix Texture Fades Embossing Folders 2PK – Snowflake Pattern & Plaid Set
Sizzix Big Shot Machine Only (Powder Blue & Teal)